-
Join the A7X Discord!
We're updating the community and moving all social content from the community to the Discord. All lessons related conversations will still take place here though! Join the Discord below and view the full announcement for more details
JOIN THE DISCORD VIEW THREAD
You are using an out of date browser. It may not display this or other websites correctly.
You should upgrade or use an alternative browser.
You should upgrade or use an alternative browser.
Filters
Show only:

Synyster Gates Ideal Amp Settings
Hello everyone, I'm here posting just the ideal amp settings for a typical A7x song ranging from gain, mid, treble, bass, presence, master volume, pedals, reverbs, eq graphics. Everything. If anyone has obtained an identical sound from any album whatsoever, I'd love to hear about it.
Scream solo picking pattern
- By Xzavier471
- General Chat
- 10 Replies
Hello everyone just wondering if anybody knew what the picking pattern to the solo in Scream is? I play it down up down and then up when playing the second string and then down up down etc but I'm not sure if this is the way Syn plays it.
NEW HOMEWORK: Lesson 10 And Tutorials!
- General Chat
- 59 Replies
Ooookaaayyy…
First off, BIG thanks to Calvin for trying to do this in my absence and Hector for taking over the live feed. You both are extremely wonderful. I’m a little confused as to why no one did Calvin’s task but regardless if it’s me or someone else who decides to issue a homework challenge, we should all show support and jump on the bandwagon.
I’ll try…
Lesson 10 is very important to grasp the basic concepts of soloing over chords so here it goes.
Beginners: Find a three chord progression and demonstrate what your “6 Magic Notes” would be over those chords. Be sure to name the chord AND the corresponding notes.
Intermediate: Write a riff using the 6 magic notes over a chord progression of your choice. For example, if you were to do a basic jazz ii-V-I progression, choose a backing track that features this progression in your key signature and perform that riff each time the chords change.
Advanced: Compose your own Etude using ONLY the six magic notes a straight backing track. For example, don’t do something where the chords change every other count. Something a little more straightforward. Think “Betcha Can’t Play This” column in the guitar magazine.
++++++++++++++ALSO!!!++++++++++++++++
If you post your work here and want access to the tutorials I’ve done, let me know! As I stated on my Instagram my tutorial work is strictly for those who are active with the lessons here. It’s my way of saying “Great job, you earned it” to those who put so much work into their craft.
Tutorial List
1. Scream
2. Shepherd of Fire
3. Nightmare
4. Hail To The King
5. Buried Alive
They are not ALL completed yet. But I’m working on getting them all finished.
PLUS!
Please join me THIS SATURDAY, FEBRUARY 16th at 3pm CST to demonstrate your homework, welcome a new student, AND I’ll be having a guitar talk with Rowan and discussing her guitar insight and some valuable points we both share about guitar and beginners. Only those who have performed the homework or want to show off what they learned in a LESSON will be permitted to go live.
Love you all! We track bass and vocals next in the studio!
Jak
-
Lesson
Alternate Picking Exercises 1 & 2 – Lesson 40
- By SynGates.com
- Lessons Classrooms
- 13 Replies
In this lesson we go over two important alternate picking exercises that will help you sync your right hand to your left.
CIRCLE OF FIFTHS!
- General Chat
- 8 Replies
Whaddup Folks....its me again...
I just had to share this video on the circle of fifths its so amazing. I know PGs lesson was amazing too! But this is even more hacks that come witht the circle of Fifths!
Login to view embedded media
Enjoy!
I just had to share this video on the circle of fifths its so amazing. I know PGs lesson was amazing too! But this is even more hacks that come witht the circle of Fifths!
Login to view embedded media
Enjoy!
Attachments
New School Launches!
- General Chat
- 175 Replies
What's up $ynners?! We all appreciate how patient you have been while the team has worked diligently to bring you this new and improved school. Of course, there are DOZENS of new features to improve your learning experience. Feel free to snoop around, poke around and explore. If you have any questions please drop a comment below! I'll be doing a tutorial on the new website very soon!
Also, please stay tuned for the badass blues series by Papa Gates!
Also, please stay tuned for the badass blues series by Papa Gates!
Intermediate Theory Request #3 - Modal Scales
- Advanced Techniques & Theory
- 3 Replies
1. Topics of discussion
In this lesson, we will discuss modal scales. So, get on the square and on the level, and let's go.
2. Modal scales explained
Modal scales (or modes) are some special scales that follow different rules than regular major and minor scales. The easiest way to understand them though is in relation to a major scale.
Let's consider the C major scale. The notes of it are, in order, C, D, E, F, G, A, and B. However, what would happen if we played the same notes, but started on D? We would get D, E, F, G, A, B, and C. In other words, we get a scale that kind of looks like a D minor scale, but isn't, because the regular minor scale formula does not apply to it.
The scale we just got is called a D Dorian scale. Dorian scales are formed by playing the notes of a major scale, starting on the second note of that particular scale.
The same process can be applied for all the other notes of the scale, including the root note. That's right, the major scale itself is a modal scale. It's called the Ionian mode or Ionian scale.
Since there are 7 different notes in a major scale, we have 7 different modal scales as a result:

3. Modal scale formulas
Much like how major scales and minor scales have formulas based on the tonal distance between notes. so too do modes. Let's take a look at them:
4. Around the fretboard
The 7 ways of playing major scales from above are not the only way in which you can play these little creatures. In another thread, we talked about the CAGED system for major scales. And guess what, since modal scales make use of the same damn notes the major scales makes use of, once you figure out the CAGED system forms for the major scales of your choosing, those shapes are the same ones you can use for the modal scales as well.
The only difference is where we consider the root note to be. And of course, what is the C form for the C major scale will have a totally different name for one of the modal scales. Honestly though, unless you're planning on taking some musical course designed by the musical equivalent of Sheldon Cooper, I wouldn't worry about the correspondence. Just make sure you use the correct CAGED forms based on your selected major scale.
And if by accident you hit a note outside of those, hey, you're adding color to your playing by adding chromatic tones.
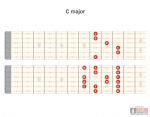
Anyhow, here's the CAGED system forms for the C major scale. I also included the chord shape used to determine the name of the form:
C form

A form

G form

E form

D form

That about covers it for this one.
In this lesson, we will discuss modal scales. So, get on the square and on the level, and let's go.
2. Modal scales explained
Modal scales (or modes) are some special scales that follow different rules than regular major and minor scales. The easiest way to understand them though is in relation to a major scale.
Let's consider the C major scale. The notes of it are, in order, C, D, E, F, G, A, and B. However, what would happen if we played the same notes, but started on D? We would get D, E, F, G, A, B, and C. In other words, we get a scale that kind of looks like a D minor scale, but isn't, because the regular minor scale formula does not apply to it.
The scale we just got is called a D Dorian scale. Dorian scales are formed by playing the notes of a major scale, starting on the second note of that particular scale.
The same process can be applied for all the other notes of the scale, including the root note. That's right, the major scale itself is a modal scale. It's called the Ionian mode or Ionian scale.
Since there are 7 different notes in a major scale, we have 7 different modal scales as a result:
- Ionian scale - it's basically the major scale (for C major, that would be the C major scale: C, D, E, F, G, A, and B)
- Dorian scale - formed by playing the notes of the major scale starting from the second note (for C major, that would be the D Dorian scale: D, E, F, G, A, B, and C)
- Phrygian scale - formed by playing the notes of the major scale starting from the third note (For C major, that would be the E Phrygian scale: E, F, G, A, B, C, and D)
- Lydian scale - formed by playing the notes of the major scale starting from the fourth note (For C major, that would be the F Lydian scale: F, G, A, B, C, D, and E)
- Mixolydian scale - formed by playing the notes of the major scale starting from the fifth note (For C major, that would be the G Mixolydian scale: G, A, B, C, D, E, and F)
- Aeolian scale - formed by playing the notes of the major scale starting from the sixth note (For C major, that would be the A Aeolian scale: A, B, C, D, E, F, and G); note that this is basically the relative minor scale for the C major scale
- Locrian scale - formed by playing the notes of the major scale starting from the seventh note (For C major, that would be the B Locrian scale: B, C, D, E, F, G, and A)
3. Modal scale formulas
Much like how major scales and minor scales have formulas based on the tonal distance between notes. so too do modes. Let's take a look at them:
- Ionian scale: W-W-H-W-W-W-H
- Dorian scale: W-H-W-W-W-H-W
- Phrygian scale: H-W-W-W-H-W-W
- Lydian scale: W-W-W-H-W-W-H
- Mixolydian scale: W-W-H-W-W-H-W
- Aeolian scale: W-H-W-W-H-W-W
- Locrian scale: H-W-W-H-W-W-W
4. Around the fretboard
The 7 ways of playing major scales from above are not the only way in which you can play these little creatures. In another thread, we talked about the CAGED system for major scales. And guess what, since modal scales make use of the same damn notes the major scales makes use of, once you figure out the CAGED system forms for the major scales of your choosing, those shapes are the same ones you can use for the modal scales as well.
The only difference is where we consider the root note to be. And of course, what is the C form for the C major scale will have a totally different name for one of the modal scales. Honestly though, unless you're planning on taking some musical course designed by the musical equivalent of Sheldon Cooper, I wouldn't worry about the correspondence. Just make sure you use the correct CAGED forms based on your selected major scale.
And if by accident you hit a note outside of those, hey, you're adding color to your playing by adding chromatic tones.
Anyhow, here's the CAGED system forms for the C major scale. I also included the chord shape used to determine the name of the form:
C form
A form
G form
E form
D form
That about covers it for this one.
Theory Request #2 - The CAGED system for major scales
- Advanced Techniques & Theory
- 0 Replies
1. Topics of discussion
In this thread, we're going to discuss the CAGED system for major scales. So, let's get on the square and on the level.
2. The CAGED system chord shapes
So, the name CAGED system originates from the 5 open chord shapes (or forms) used in its name: C, A, G, E, and D. let's take a look at them:
These shapes can be used to play any chord you might think of by moving up and down your guitar. Here is the C chord played using those 5 forms:
E|--0------3------8-----8-----12---|
B|--1------5------5-----8-----13---|
G|--0------5------5-----9-----12---|
D|--2------5------5-----10----10---|
A|--3------3------7-----10---------|
E|----------------8-----8----------|
Basically, when someone tells you they play the A chord using the C form, it means that they are using the form of the open C chord, but instead of playing it as you see above, they play it like this:
E|--9---|
B|--10--|
G|--9---|
D|--11--|
A|--12--|
E|------|
The same rule is applied for the other shapes as well. Hence why such chord shapes are known as movable shapes, because you can change the chord you're playing by moving up and down your instrument and using the same shapes.
3. Arpeggio
An arpeggio is obtained by playing the notes of a chord individually rather than together. Let's play the C chords from above as an arpeggio:
E|--------------0---| E|--------------3---| E|-----------------8---| E|-------------------8---| E|----------------12--|
B|-----------1------| B|-----------5------| B|--------------5------| B|----------------8------| B|------------13------|
G|--------0---------| G|--------5---------| G|-----------5---------| G|-------------9---------| G|--------12----------|
D|-----2------------| D|-----5------------| D|--------5------------| D|---------10------------| D|----10--------------|
A|--3---------------| A|--3---------------| A|-----7---------------| A|-----10----------------| A|--------------------|
E|------------------| E|------------------| E|--8------------------| E|--8--------------------| E|--------------------|
4. The CAGED system for major scales
In the examples above, we focused on playing the notes that were part of the chord shape. This time around, let's try adding notes which are still part of the chord, but not part of the chord shape. For example, let's try adding some extra notes around the open C form:

See how instead of playing only the notes from the shape, we also added some extra notes on the low E string and on the high E string? Now, let's take it an extra step further and insert the missing notes of the C major scale, which for this example would be D, F, A, and B:

And that's how you get the C form of the C major scale, using the CAGED system. Let's check out the forms for the other ones as well:

Next up, the G form:

Let's move on to the E form:

Finally, the D form:

Now, that about wraps it up. Get to playing and see you in the next poll.
In this thread, we're going to discuss the CAGED system for major scales. So, let's get on the square and on the level.
2. The CAGED system chord shapes
So, the name CAGED system originates from the 5 open chord shapes (or forms) used in its name: C, A, G, E, and D. let's take a look at them:
E|--0------0------3-----0-----2---|
B|--1------2------0-----0-----3---|
G|--0------2------0-----1-----2---|
D|--2------2------0-----2-----0---|
A|--3------0------2-----2---------|
E|----------------3-----0---------|
B|--1------2------0-----0-----3---|
G|--0------2------0-----1-----2---|
D|--2------2------0-----2-----0---|
A|--3------0------2-----2---------|
E|----------------3-----0---------|
These shapes can be used to play any chord you might think of by moving up and down your guitar. Here is the C chord played using those 5 forms:
E|--0------3------8-----8-----12---|
B|--1------5------5-----8-----13---|
G|--0------5------5-----9-----12---|
D|--2------5------5-----10----10---|
A|--3------3------7-----10---------|
E|----------------8-----8----------|
Basically, when someone tells you they play the A chord using the C form, it means that they are using the form of the open C chord, but instead of playing it as you see above, they play it like this:
E|--9---|
B|--10--|
G|--9---|
D|--11--|
A|--12--|
E|------|
The same rule is applied for the other shapes as well. Hence why such chord shapes are known as movable shapes, because you can change the chord you're playing by moving up and down your instrument and using the same shapes.
3. Arpeggio
An arpeggio is obtained by playing the notes of a chord individually rather than together. Let's play the C chords from above as an arpeggio:
E|--------------0---| E|--------------3---| E|-----------------8---| E|-------------------8---| E|----------------12--|
B|-----------1------| B|-----------5------| B|--------------5------| B|----------------8------| B|------------13------|
G|--------0---------| G|--------5---------| G|-----------5---------| G|-------------9---------| G|--------12----------|
D|-----2------------| D|-----5------------| D|--------5------------| D|---------10------------| D|----10--------------|
A|--3---------------| A|--3---------------| A|-----7---------------| A|-----10----------------| A|--------------------|
E|------------------| E|------------------| E|--8------------------| E|--8--------------------| E|--------------------|
4. The CAGED system for major scales
In the examples above, we focused on playing the notes that were part of the chord shape. This time around, let's try adding notes which are still part of the chord, but not part of the chord shape. For example, let's try adding some extra notes around the open C form:
See how instead of playing only the notes from the shape, we also added some extra notes on the low E string and on the high E string? Now, let's take it an extra step further and insert the missing notes of the C major scale, which for this example would be D, F, A, and B:
And that's how you get the C form of the C major scale, using the CAGED system. Let's check out the forms for the other ones as well:
Next up, the G form:
Let's move on to the E form:
Finally, the D form:
Now, that about wraps it up. Get to playing and see you in the next poll.
Theory Request #1 - Major Scales explained
- Advanced Techniques & Theory
- 9 Replies
1. Topics of discussion
In this thread, we're going to discuss major scales and how to play them on the guitar. This request came from @Kim La . So, let's get on the square and on the level.
2. Steps, half-steps, and frets
Much like how you can measure the distance between cities in kilometers or miles, so too can you measure the distance between notes in steps and half-steps. These bad boys are also known as tones and semitones or whole tones and half tones.
A half-step is the smallest tonal distance between two notes. On your guitar, that is basically the distance between two consecutive frets on the same string. A step consists of two half-steps, which as you can see translates to two frets on your guitar.
3. Major scale formula
Major scales consist of 7 different notes, which follow the following formula:
W stands for whole step while H stands for half-step. And what we have in the formula is the distance between two consecutive notes of the scale, in ascending order.
In other words, the difference between the first note and the second note is a whole step, the difference between the second note and the third note is also a whole step, and so on.
Since there are 7 distances there, one can conclude that a major scale has 8 notes. Then why did I say 7 earlier? Because, while there are in fact 8 notes, one of them is repeated. The note that is repeated is the first note, which is also played at the end of the scale, an octave higher than the note that started the whole thing.
4. Figuring out the notes of a scale
When it comes to a standard tuned guitar, these are the notes you can play on each string:

If we are to play the notes of the C major scale, then by applying the formula above, we would get C, D, E, F, G, A, B and we would end on C again. Kind of like this:

Of course, there are many other scales for you to choose from. It would be highly indicated to study the lesson the Papa Gates has on the Circle of 5ths in order to gain an even easier way to figure out the notes of each scale.
5. The CAGED system forms for major scales
The CAGED system is based on 5 chord forms. The name of the chors are in the name of the system and they are of course the basic forms of the C, A, G, E and D chords, which look like this:
|--0----0----3----0----2--|
|--1----2----0----0----3--|
|--0----2----0----1----2--|
|--2----2----0----2----0--|
|--3----0----2----2-------|
|------------3----0-------|
If we are to play the C chord using all these shapes, it would look like this:
|--0----3----8----8-----12--|
|--1----5----5----8-----13--|
|--0----5----5----9-----12--|
|--2----5----5----10----10--|
|--3----3----7----10--------|
|------------8----8---------|
In order to successfully play major scales using the CAGED system forms, you need to learn the shapes of the root chord of the scale (the chord formed on the first note), using these movable shapes. Afterwards, you just add the missing notes of the scale which are located on the frets you're not using to play the chord. Let's look at the C form for example:

Let's move on to the A form:

Next up, the G form:

The E form is next:

Finally, the D form:

6. The 7 positions of the major scale
Papa Gates has a wonderful tutorial on this. Basically, the 7 positions of the major scale is a concept referring to you playing a major scale in 7 different ways, starting on a different note each time:

That should wrap everything up.
In this thread, we're going to discuss major scales and how to play them on the guitar. This request came from @Kim La . So, let's get on the square and on the level.
2. Steps, half-steps, and frets
Much like how you can measure the distance between cities in kilometers or miles, so too can you measure the distance between notes in steps and half-steps. These bad boys are also known as tones and semitones or whole tones and half tones.
A half-step is the smallest tonal distance between two notes. On your guitar, that is basically the distance between two consecutive frets on the same string. A step consists of two half-steps, which as you can see translates to two frets on your guitar.
3. Major scale formula
Major scales consist of 7 different notes, which follow the following formula:
W-W-H-W-W-W-H
W stands for whole step while H stands for half-step. And what we have in the formula is the distance between two consecutive notes of the scale, in ascending order.
In other words, the difference between the first note and the second note is a whole step, the difference between the second note and the third note is also a whole step, and so on.
Since there are 7 distances there, one can conclude that a major scale has 8 notes. Then why did I say 7 earlier? Because, while there are in fact 8 notes, one of them is repeated. The note that is repeated is the first note, which is also played at the end of the scale, an octave higher than the note that started the whole thing.
4. Figuring out the notes of a scale
When it comes to a standard tuned guitar, these are the notes you can play on each string:
If we are to play the notes of the C major scale, then by applying the formula above, we would get C, D, E, F, G, A, B and we would end on C again. Kind of like this:
Of course, there are many other scales for you to choose from. It would be highly indicated to study the lesson the Papa Gates has on the Circle of 5ths in order to gain an even easier way to figure out the notes of each scale.
5. The CAGED system forms for major scales
The CAGED system is based on 5 chord forms. The name of the chors are in the name of the system and they are of course the basic forms of the C, A, G, E and D chords, which look like this:
|--0----0----3----0----2--|
|--1----2----0----0----3--|
|--0----2----0----1----2--|
|--2----2----0----2----0--|
|--3----0----2----2-------|
|------------3----0-------|
If we are to play the C chord using all these shapes, it would look like this:
|--0----3----8----8-----12--|
|--1----5----5----8-----13--|
|--0----5----5----9-----12--|
|--2----5----5----10----10--|
|--3----3----7----10--------|
|------------8----8---------|
In order to successfully play major scales using the CAGED system forms, you need to learn the shapes of the root chord of the scale (the chord formed on the first note), using these movable shapes. Afterwards, you just add the missing notes of the scale which are located on the frets you're not using to play the chord. Let's look at the C form for example:
Let's move on to the A form:
Next up, the G form:
The E form is next:
Finally, the D form:
6. The 7 positions of the major scale
Papa Gates has a wonderful tutorial on this. Basically, the 7 positions of the major scale is a concept referring to you playing a major scale in 7 different ways, starting on a different note each time:
That should wrap everything up.
Attachments
-
Lesson
More New Chords With Old Chords Am- Dm- E7 – Lesson 15
- By SynGates.com
- Lessons Classrooms
- 8 Replies
In this lesson we add Dm & E7 with new strumming patterns.
Advanced ADVANCED THEORY - Lesson 10 - Octave changes
- Advanced Techniques & Theory
- 0 Replies
So now we're supposed to like jump up and down on an instrument or what?
In this tutorial, we are going to talk about octave change markers and how they impact a song. So, let's have some fun.
2. Octave change markers
If you take a look at a piano, you'll notice that it has a lot of possible notes on it. And if you remember, each staff has only 5 lines on it, so in order to represent some notes on it, you would have to use helper lines. That is all fine and dandy until you have to place a note at either end of the piano spectrum on your sheet. The sheer number of helper lines would probably make some people interrupt their virtuoso experience in order to figure out what they should be playing.
And that's where octave change markers come into play. These markers inform a musician that the notes on the sheet are meant to be played an octave higher or lower, depending on the marker of course. Here is how octave markers look on a music sheet:

And here it is played back.
The process of playing a note a number of semitones or octaves higher is called transposing by the way, in case you encounter this term and are unsure of what it means.
There will be some music sheets where these markers are written as 8va (for transposing a section an octave higher) or 8vb (for transposing a section an octave lower).
And finally, you may also encounter sheets that use the 15va or 15vb markers, which means that you have to transpose a note or a section by two octaves.
And yeah...that about covers it for this one. In the next one, we are going to discuss various articulations that you may encounter. See you then.
- Topics of discussion
- Octave change markers
In this tutorial, we are going to talk about octave change markers and how they impact a song. So, let's have some fun.
2. Octave change markers
If you take a look at a piano, you'll notice that it has a lot of possible notes on it. And if you remember, each staff has only 5 lines on it, so in order to represent some notes on it, you would have to use helper lines. That is all fine and dandy until you have to place a note at either end of the piano spectrum on your sheet. The sheer number of helper lines would probably make some people interrupt their virtuoso experience in order to figure out what they should be playing.
And that's where octave change markers come into play. These markers inform a musician that the notes on the sheet are meant to be played an octave higher or lower, depending on the marker of course. Here is how octave markers look on a music sheet:
And here it is played back.
The process of playing a note a number of semitones or octaves higher is called transposing by the way, in case you encounter this term and are unsure of what it means.
There will be some music sheets where these markers are written as 8va (for transposing a section an octave higher) or 8vb (for transposing a section an octave lower).
And finally, you may also encounter sheets that use the 15va or 15vb markers, which means that you have to transpose a note or a section by two octaves.
And yeah...that about covers it for this one. In the next one, we are going to discuss various articulations that you may encounter. See you then.
Advanced ADVANCED THEORY - Lesson 9 - Repetition markers
- Advanced Techniques & Theory
- 0 Replies
Is this some sort of subtle dig on how people believe all music sounds the same or what?
In this tutorial, we will be discussing the many types of repetition markers in music. So, let's have some fun.
2. Simple repetition markers
Repetition markers are used to designate sections of a song that are meant to be played twice. They are very common in classical music and one of the more common ways in which they are used is the one that tells you to repeat the whole song twice. Here is how that looks on a music sheet:

And here it is played back.
Of course, in a song, you may have more sections that you want to be repeated. This is especially useful for classical music forms such as sonata where the sections of the song are repeated. Here's how it looks on a music sheet:

And here it is played back.
And a final example here would be of a repeated section in between two regular sections, something like this:

And here it is played back.
3. Advanced repetition markers
Now that we figured stuff out with the basics of repetition, let's take a look at some advanced repetition markers. Such repetition markers allow you to do several things:

And here it is played back.
As you can see, we have two bars that have a weird sign on them. What that translates to is basically this: the bars with those signs on them have the same notes as the previous bar. In our case, the first time we see that sign, it means that we have to play the C D E F notes since the first bar consisted of those notes. And the second time, we also have to play the C D E F notes since the previous bar also had those notes.
Let's move on to alternate endings. In your musical journeys, you may also encounter these under the name voltas. Here's how they look like on a music sheet:

And here it is played back.
And now, let's move on to the fun part of this tutorial, learning a bunch of new Italian words:
Here are a segno and coda example:

And here it is played back.
Anyway, that about covers it for this tutorial. In the next tutorial, we will be discussing octave changes. See you then.
- Topics of discussion
- Simple repetition markers
- Advanced repetition markers
In this tutorial, we will be discussing the many types of repetition markers in music. So, let's have some fun.
2. Simple repetition markers
Repetition markers are used to designate sections of a song that are meant to be played twice. They are very common in classical music and one of the more common ways in which they are used is the one that tells you to repeat the whole song twice. Here is how that looks on a music sheet:
And here it is played back.
Of course, in a song, you may have more sections that you want to be repeated. This is especially useful for classical music forms such as sonata where the sections of the song are repeated. Here's how it looks on a music sheet:
And here it is played back.
And a final example here would be of a repeated section in between two regular sections, something like this:
And here it is played back.
3. Advanced repetition markers
Now that we figured stuff out with the basics of repetition, let's take a look at some advanced repetition markers. Such repetition markers allow you to do several things:
- tell a musician that a certain measure needs to be repeated a number of times
- tell a musician that you have alternate endings to a repeated section
- use even more Italian words to tell a musician where to start repeating a section from
And here it is played back.
As you can see, we have two bars that have a weird sign on them. What that translates to is basically this: the bars with those signs on them have the same notes as the previous bar. In our case, the first time we see that sign, it means that we have to play the C D E F notes since the first bar consisted of those notes. And the second time, we also have to play the C D E F notes since the previous bar also had those notes.
Let's move on to alternate endings. In your musical journeys, you may also encounter these under the name voltas. Here's how they look like on a music sheet:
And here it is played back.
And now, let's move on to the fun part of this tutorial, learning a bunch of new Italian words:
- capo - translates to beginning
- fine - translates to end
- coda - basically means outro
- segno - translates to sign or mark
- D.C - it means da capo, which translates to from beginning
- D.C. al Fine - it means da capo al fine, which translates to from beginning to end
- D.C. al Coda - it means da capo al coda
- D.S. - it means da segno, which translates to from the sign
- D.S. al Fine - it means da segno al fine
- D.S. al Coda - it means da segno al coda
Here are a segno and coda example:
And here it is played back.
Anyway, that about covers it for this tutorial. In the next tutorial, we will be discussing octave changes. See you then.
Advanced ADVANCED THEORY - Lesson 8 - Linked notes
- Advanced Techniques & Theory
- 0 Replies
So we have to use chains with our notes now?
In this tutorial, we will be talking about linked notes. So, let's have some fun.
2. Linked (legato) notes
Linked notes are notes that are tied together by a curved line on a music sheet. You may also find these notes referred to as tied notes or legato notes. How linked notes are played is very dependent on the instrument, but there is a general idea behind them. But before that, let's take a look at some legato examples:

And here they are played back.
So, what about these linked notes? Well, it's a bit hard to describe in written form, but here it goes. On a piano, when notes are not linked, the steps to playing them are the following:
However, there is also another way in which you can link notes, which is present in the 3rd and 4th bars of the example above. This is easier, as you can hear. Basically, when you have notes linked in this manner, you consider them as a single note. And the length of that combined note is the sum of the notes which are linked.
And that about covers it for this tutorial as well. In the next one, we will be discussing repetition markers. See you then.
- Topics of discussion
- Linked (legato) notes
In this tutorial, we will be talking about linked notes. So, let's have some fun.
2. Linked (legato) notes
Linked notes are notes that are tied together by a curved line on a music sheet. You may also find these notes referred to as tied notes or legato notes. How linked notes are played is very dependent on the instrument, but there is a general idea behind them. But before that, let's take a look at some legato examples:
And here they are played back.
So, what about these linked notes? Well, it's a bit hard to describe in written form, but here it goes. On a piano, when notes are not linked, the steps to playing them are the following:
- play the note
- lift the finger
- play the next note
However, there is also another way in which you can link notes, which is present in the 3rd and 4th bars of the example above. This is easier, as you can hear. Basically, when you have notes linked in this manner, you consider them as a single note. And the length of that combined note is the sum of the notes which are linked.
And that about covers it for this tutorial as well. In the next one, we will be discussing repetition markers. See you then.
Advanced ADVANCED THEORY - Lesson 7 - Rallentando and accelerando
- Advanced Techniques & Theory
- 0 Replies
Are you entirely sure I don't have to learn another language for this course?
In this tutorial, we will be discussing two musical terms that indicate you should change the tempo of the song. So, let's have some fun.
2. Rallentando
In music, rallentando is used to signify that the section of music marked with this term is to be played gradually slower. What I mean by that is that when you play it, you have to decrease the tempo a bit during the section and then move back to the original speed.
How much slower should the section be played you ask? Well, it depends on the tempo of the song. For example, if a song is meant to be played at 120 BPM, then you should gradually reduce the speed to something like 100 BPM. However, if the song is meant to be played at a slower tempo, say 90BPM or lower, then you should reduce the tempo by 10 to maximum 15 BPM to 80BPM or 75 BPM. You need to adapt to the song so as to now slow down too much, You don't want people falling asleep waiting for the next note, you know? The example I will provide uses a 20BPM tempo change, just so you know.
On a music sheet, a rallentando section is notated with rall.... or rallentando, depending on what notation the person who transcribed the song prefers.
Here is an example of how a rallentando section looks and sounds. First off, the music sheet:

And here it is played back.
3. Accelerando
Accelerando is the opposite of rallentando and it means that you need to play the section marked with accelerando at a gradually faster tempo. The tempo change rules are pretty much the same, though I wouldn't recommend going too fast regardless of the tempo. The example I will provide uses a 20BPM tempo change, just so you know.
Notation wise, you will encounter either an accel... or accelerando notation on your sheet. Here is an example:

And here it is played back.
And that about covers it for this tutorial. In the next one, we will be discussing linked notes. See you then.
- Topics of discussion
- Rallentando
- Accelerando
In this tutorial, we will be discussing two musical terms that indicate you should change the tempo of the song. So, let's have some fun.
2. Rallentando
In music, rallentando is used to signify that the section of music marked with this term is to be played gradually slower. What I mean by that is that when you play it, you have to decrease the tempo a bit during the section and then move back to the original speed.
How much slower should the section be played you ask? Well, it depends on the tempo of the song. For example, if a song is meant to be played at 120 BPM, then you should gradually reduce the speed to something like 100 BPM. However, if the song is meant to be played at a slower tempo, say 90BPM or lower, then you should reduce the tempo by 10 to maximum 15 BPM to 80BPM or 75 BPM. You need to adapt to the song so as to now slow down too much, You don't want people falling asleep waiting for the next note, you know? The example I will provide uses a 20BPM tempo change, just so you know.
On a music sheet, a rallentando section is notated with rall.... or rallentando, depending on what notation the person who transcribed the song prefers.
Here is an example of how a rallentando section looks and sounds. First off, the music sheet:
And here it is played back.
3. Accelerando
Accelerando is the opposite of rallentando and it means that you need to play the section marked with accelerando at a gradually faster tempo. The tempo change rules are pretty much the same, though I wouldn't recommend going too fast regardless of the tempo. The example I will provide uses a 20BPM tempo change, just so you know.
Notation wise, you will encounter either an accel... or accelerando notation on your sheet. Here is an example:
And here it is played back.
And that about covers it for this tutorial. In the next one, we will be discussing linked notes. See you then.
Advanced ADVANCED THEORY - Lesson 6 - Fermata
- Advanced Techniques & Theory
- 0 Replies
So like, are there any other people out there who coined these terms aside from Italians?
In this tutorial, we will be discussing the concept of fermata. So, let's have some fun.
2. Fermata explained
In music, a fermata is used on a note to signify the fact that that note is to have a longer length than whatever length is notated on the sheet for it. In other words, whenever you encounter a fermata on a note, you are to play that note for a longer period than its original length. This is left to each musician's choice but more often than not, the length of the note is to be doubled.
One thing to note is that even though you are meant to play that note for longer than what is written on the sheet, the number of notes from the measure is not affected by it. In other words, if you have 4 quarter notes in a bar and you add a fermata to one of them, you don't need to play fewer notes because of it.
Visually, a fermata looks like this:

Here is the section above, played back.
And yeah, that about covers it for this tutorial. In the next one, we are going to discuss some tempo changing markers. See you then.
- Topics of discussion
- Fermata explained
In this tutorial, we will be discussing the concept of fermata. So, let's have some fun.
2. Fermata explained
In music, a fermata is used on a note to signify the fact that that note is to have a longer length than whatever length is notated on the sheet for it. In other words, whenever you encounter a fermata on a note, you are to play that note for a longer period than its original length. This is left to each musician's choice but more often than not, the length of the note is to be doubled.
One thing to note is that even though you are meant to play that note for longer than what is written on the sheet, the number of notes from the measure is not affected by it. In other words, if you have 4 quarter notes in a bar and you add a fermata to one of them, you don't need to play fewer notes because of it.
Visually, a fermata looks like this:
Here is the section above, played back.
And yeah, that about covers it for this tutorial. In the next one, we are going to discuss some tempo changing markers. See you then.
Advanced ADVANCED THEORY - Lesson 5 - Tuplets
- Advanced Techniques & Theory
- 0 Replies
Is it too late to hope for an English only tutorial?
In this tutorial, we will be discussing tuplets. So, let's have some fun.
2. Tuplets explained
In music, a tuplet is a technique that allows you to alter the length of a note and create new note groupings that give a totally different feel to your songs.
The most common form of tuplets is the triplet, in which 3 notes are used to form a new group of notes. The rules that apply to triplet notes with regards to length are pretty simple. When you play 3 eighth note triplets, the length of that group of notes is that of a quarter note. In other words, the length of a triplet 8th note is equal to a third of the length of a quarter note.
Before we move on to more advanced tuplets, here are some triplet note examples:

And here it is played back.
Notation wise, as you can see, the notes that are part of a triplet are grouped with a line above them which contains the digit 3.
Moving on to more complex tuplets, the notation is basically the same, the only difference being the digit that is used. You can theoretically group notes in whatever manner you like, however, the most common way to do so is by using uneven numbers such as 3, 5 and 7. This is due to the fact that 2 note groups and 4 note groups are just fancy way of writing notes that can be easily substituted with eighth notes and sixteenth notes and so on.
And now, let's tackle the length aspect of tuplets. How does one know how long a tuplet note should last in general? I mean I already mentioned something about this with triplets, but we need to figure out a general rule for this. And the general rule is as follows: an n-tuplet tells you that n notes of the given tuplet length last as long as (n-1) notes of the length used to from the tuplet.
And since that is the most abstract thing you have read today, here are some examples:
Here's a quintuplet example:

And here it is played back.
And that about covers it for this tutorial. In the next one, we are going to discuss the concept of fermata. See you then.
- Topics of discussion
- Tuplets explained
In this tutorial, we will be discussing tuplets. So, let's have some fun.
2. Tuplets explained
In music, a tuplet is a technique that allows you to alter the length of a note and create new note groupings that give a totally different feel to your songs.
The most common form of tuplets is the triplet, in which 3 notes are used to form a new group of notes. The rules that apply to triplet notes with regards to length are pretty simple. When you play 3 eighth note triplets, the length of that group of notes is that of a quarter note. In other words, the length of a triplet 8th note is equal to a third of the length of a quarter note.
Before we move on to more advanced tuplets, here are some triplet note examples:
And here it is played back.
Notation wise, as you can see, the notes that are part of a triplet are grouped with a line above them which contains the digit 3.
Moving on to more complex tuplets, the notation is basically the same, the only difference being the digit that is used. You can theoretically group notes in whatever manner you like, however, the most common way to do so is by using uneven numbers such as 3, 5 and 7. This is due to the fact that 2 note groups and 4 note groups are just fancy way of writing notes that can be easily substituted with eighth notes and sixteenth notes and so on.
And now, let's tackle the length aspect of tuplets. How does one know how long a tuplet note should last in general? I mean I already mentioned something about this with triplets, but we need to figure out a general rule for this. And the general rule is as follows: an n-tuplet tells you that n notes of the given tuplet length last as long as (n-1) notes of the length used to from the tuplet.
And since that is the most abstract thing you have read today, here are some examples:
- in a triplet that is formed using quarter notes, 3 triplet quarter notes last as long as 2 quarter notes, which means 3 triplet quarter notes last for two beats, which means a single triplet quarter note lasts one third of two beats, or, simply put, two thirds of a beat
- in a quintuplet (a tuplet consisting of 5 notes) that is formed using eighth notes, 5 quintuplet eighth notes last as long as 4 eighth notes, which is also equivalent to two beats, which means that a single quintuplet eighth note wil last for 2 fifths of a beat
Here's a quintuplet example:
And here it is played back.
And that about covers it for this tutorial. In the next one, we are going to discuss the concept of fermata. See you then.
Advanced ADVANCED THEORY - Lesson 4 - Dotted and staccato notes
- Advanced Techniques & Theory
- 0 Replies
So basically...I mean, what even are those words?
In this tutorial, we will be talking dotted and staccato notes, which are basically regular notes but with modified lengths. So, let's have some fun.
2. Dotted notes
Dotted notes are basically regular notes that have a dot next to them. I know, nothing spectacular. However, that dot next to the note has a very important significance. Whenever you see a dotted note, it means that it's length is increased by half.
What does that mean? Well, it's pretty simple. If you have a dotted quarter note, it means that that note will last a beat and a half. As you know, a quarter note lasts for a beat. Therefore, if we would increase that length by half, it means that the note will last a beat and a half. If it makes it easier to understand, it lasts the equivalent of a quarter note + an eighth note.
Here is how dotted notes look like on a music sheet:

And here it is played back.
3. Staccato notes
Staccato notes function somewhat in reverse to dotted notes, in that a staccato note has its length halved. In other words, if you have a staccato quarter note, you only have to play it for half of its length, which would translate to an eighth note. Staccato notes are notated by using a dot under the note rather than next to it.
The main difference between dotted and staccato notes is that a staccato note does not influence the other note lengths from a measure. What I mean by that is that beat wise, a staccato quarter note is counted as a beat in a measure, even though it lasts an eighth note.
So, hoes does one play a staccato note on an instrument? I mean, it may be confusing because a staccato note counts as a regular note, even though it should last half as long. Well, it's quite easy. You simply lift your finger from the piano key/instrument string after the required time.
Here is a music sheet example for staccato notes:

And here it is played back.
And that about covers it for this tutorial. In the next one, we are going to be discussing tuplets. See you then.
- Topics of discussion
- Dotted notes
- Staccato notes
In this tutorial, we will be talking dotted and staccato notes, which are basically regular notes but with modified lengths. So, let's have some fun.
2. Dotted notes
Dotted notes are basically regular notes that have a dot next to them. I know, nothing spectacular. However, that dot next to the note has a very important significance. Whenever you see a dotted note, it means that it's length is increased by half.
What does that mean? Well, it's pretty simple. If you have a dotted quarter note, it means that that note will last a beat and a half. As you know, a quarter note lasts for a beat. Therefore, if we would increase that length by half, it means that the note will last a beat and a half. If it makes it easier to understand, it lasts the equivalent of a quarter note + an eighth note.
Here is how dotted notes look like on a music sheet:
And here it is played back.
3. Staccato notes
Staccato notes function somewhat in reverse to dotted notes, in that a staccato note has its length halved. In other words, if you have a staccato quarter note, you only have to play it for half of its length, which would translate to an eighth note. Staccato notes are notated by using a dot under the note rather than next to it.
The main difference between dotted and staccato notes is that a staccato note does not influence the other note lengths from a measure. What I mean by that is that beat wise, a staccato quarter note is counted as a beat in a measure, even though it lasts an eighth note.
So, hoes does one play a staccato note on an instrument? I mean, it may be confusing because a staccato note counts as a regular note, even though it should last half as long. Well, it's quite easy. You simply lift your finger from the piano key/instrument string after the required time.
Here is a music sheet example for staccato notes:
And here it is played back.
And that about covers it for this tutorial. In the next one, we are going to be discussing tuplets. See you then.
Advanced ADVANCED THEORY - Lesson 3 - Accentuated notes and pedal indications
- Advanced Techniques & Theory
- 0 Replies
So, do notes speak in different accents when you press a pedal, right?
In this tutorial, we will be learning all about dynamic volume markers. So, let's have some fun.
2. Accentuated notes
An accentuated note is a note that is to be played a bit louder than the other notes around it. How loud you ask? Well, about a volume level higher than the volume of the section. For example, if the section is in piano, an accentuated note should be played at a mezzo-piano level. You could also lean towards a mezzo-forte level, but never higher. As was the case with crescendo and decrescendo, the safe way to go about it is to lean towards a volume level difference so in this case, mezzo-piano.
So, how does one know that a note is an accentuated note? These notes have a > sign under them (or over them), like this:

And here it is played back. As you can hear, there is a subtle difference between the notes.
3. Pedal indications
During some songs, you may notice that the musical sheet has an indication that contains the Ped. marker along with some lines like we will se below. This is only used in music sheets for pianists since pianos have pedals. And pianos come with two or three different pedals. Usually, the pedal indications on the sheet refer to what is known as the sustain pedal, which is located on the right side of the piano, meaning you will use your right foot to press it. The sustain pedal is used to allow the notes to keep playing after you have to lift your finger from the piano keys.
On a music sheet, you will encounter the following types of lines under the notes which are to be played using the sustain pedal. As I have already mentioned, you may also encounter the Ped. indicator at the beginning of these lines. Here is an example:

And here it is played back.
Notice how the notes with pedal indications can be heard even after the finger used to press the piano key was raised.
And that about covers it for this tutorial. In the next one, we will start discussing ways in which we can modify the length of a note. See you then.
- Topics of discussion
- Accentuated notes
- Pedal indications
In this tutorial, we will be learning all about dynamic volume markers. So, let's have some fun.
2. Accentuated notes
An accentuated note is a note that is to be played a bit louder than the other notes around it. How loud you ask? Well, about a volume level higher than the volume of the section. For example, if the section is in piano, an accentuated note should be played at a mezzo-piano level. You could also lean towards a mezzo-forte level, but never higher. As was the case with crescendo and decrescendo, the safe way to go about it is to lean towards a volume level difference so in this case, mezzo-piano.
So, how does one know that a note is an accentuated note? These notes have a > sign under them (or over them), like this:
And here it is played back. As you can hear, there is a subtle difference between the notes.
3. Pedal indications
During some songs, you may notice that the musical sheet has an indication that contains the Ped. marker along with some lines like we will se below. This is only used in music sheets for pianists since pianos have pedals. And pianos come with two or three different pedals. Usually, the pedal indications on the sheet refer to what is known as the sustain pedal, which is located on the right side of the piano, meaning you will use your right foot to press it. The sustain pedal is used to allow the notes to keep playing after you have to lift your finger from the piano keys.
On a music sheet, you will encounter the following types of lines under the notes which are to be played using the sustain pedal. As I have already mentioned, you may also encounter the Ped. indicator at the beginning of these lines. Here is an example:
And here it is played back.
Notice how the notes with pedal indications can be heard even after the finger used to press the piano key was raised.
And that about covers it for this tutorial. In the next one, we will start discussing ways in which we can modify the length of a note. See you then.
Advanced ADVANCED THEORY - Lesson 2 - Crescendo and decrescendo
- Advanced Techniques & Theory
- 0 Replies
So do I have to learn Italian now or what?
In this tutorial, we will be learning all about dynamic volume markers. So, let's have some fun.
2. Crescendo and decrescendo explained
In our previous tutorial, we discussed volume indicators. And they are pretty good and all. But during some songs, you may notice some sections that have volume changes that occur in a gradual manner. Either the volume increases constantly towards a maximum or it decreases towards a minimum. But the change is not sudden, it's gradual.
And that's where these two musical terms intervene, so to speak. Crescendo tells you that you have to increase the volume towards a maximum value during a section of a song. Decrescendo tells you that you have to decrease the volume towards a minimum value during a section of a song.
On a music sheet, this looks something like this:

So, this is all fine and dandy, but how much does one have to increase or decrease the volume you ask? Well, it all depends on your style of playing and on the volume indicators present in the song. It usually goes something like this:
- Topics of discussion
- Crescendo and decrescendo explained
In this tutorial, we will be learning all about dynamic volume markers. So, let's have some fun.
2. Crescendo and decrescendo explained
In our previous tutorial, we discussed volume indicators. And they are pretty good and all. But during some songs, you may notice some sections that have volume changes that occur in a gradual manner. Either the volume increases constantly towards a maximum or it decreases towards a minimum. But the change is not sudden, it's gradual.
And that's where these two musical terms intervene, so to speak. Crescendo tells you that you have to increase the volume towards a maximum value during a section of a song. Decrescendo tells you that you have to decrease the volume towards a minimum value during a section of a song.
On a music sheet, this looks something like this:
So, this is all fine and dandy, but how much does one have to increase or decrease the volume you ask? Well, it all depends on your style of playing and on the volume indicators present in the song. It usually goes something like this:
- figure out the volume level at the beginning of the section - when approaching a crescendo or decrescendo section, you need to figure out what level you should play those notes at if there was no crescendo indicator at all
- figure out the volume at the end of the section - there will be times when the end of the crescendo/decrescendo section of the song will have a volume indicator; if it does, then you know what the volume you should strive for is; if there is no indicator, you should try to modify the volume by one or two levels maximum; for example, if the beginning is in mezzo-piano, and you have a crescendo section, you should try to increase the volume to mezzo-forte or forte maximum, if that's how you are feeling the song; the safe option, in this case, would be mezzo-forte though
Advanced ADVANCED THEORY - Lesson 1 - Volume indicators
- Advanced Techniques & Theory
- 0 Replies
So do songs like have volume dials now?
In this tutorial, we will be discussing the various volume indicators you will encounter in music. So, let's have some fun.
2. Volume indicators
The beauty of music lies in its interpretation. By interpretation, I am referring to the fact that certain sections of a song will be played at different volumes in order to induce certain emotions. For example, silent sections can be used to induce a state of calm or sadness, depending on the notes played of course, while loud sections can be used to induce anger, enthusiasm, and other emotions.
But how does one know how loud a certain section of a song is to be played? And how loud is too loud for it? Well, let's start with the first question. When using music sheets, you will encounter certain notations that indicate how loud or how soft a section needs to be played. There's a total of 8 markers and we will go through each one, from softest to loudest. So, let's see how volumes are notated on a music sheet:
3. Figuring out your volume levels
Volume indicators are cool and all but there is a small problem. They are very abstract. I mean sure, they're to the point with what they mean. But what does as soft as possible or as loud as possible mean?
This is relative to each and every musician out there. And I say this because what you might feel is as loud as possible may be different from what I feel is as loud as possible. Let's take the piano as an example. a fortissimo possibile volume would usually mean that you hit the piano keys as hard as possible without playing extra notes and you know, not hurting yourself.
So, how should you go about it? Well, there are two things you can do in order to understand how loud or soft each volume indicator should be:
- Topics of discussion
- Volume indicators
- Figuring out your volume levels
In this tutorial, we will be discussing the various volume indicators you will encounter in music. So, let's have some fun.
2. Volume indicators
The beauty of music lies in its interpretation. By interpretation, I am referring to the fact that certain sections of a song will be played at different volumes in order to induce certain emotions. For example, silent sections can be used to induce a state of calm or sadness, depending on the notes played of course, while loud sections can be used to induce anger, enthusiasm, and other emotions.
But how does one know how loud a certain section of a song is to be played? And how loud is too loud for it? Well, let's start with the first question. When using music sheets, you will encounter certain notations that indicate how loud or how soft a section needs to be played. There's a total of 8 markers and we will go through each one, from softest to loudest. So, let's see how volumes are notated on a music sheet:
- ppp - this is read as pianissimo possibile and it tells you that the notes from that section should be played as soft as possible, and by that I mean you have to barely touch the keys or strings of your instrument
- pp - this is read as pianissimo and it tells you that the notes from that section need to be played very softly, meaning that they should be played a bit louder thatn ppp notes, but not by much
- p - this is read as piano (not to be confused with the instrument) and it means that the notes from that section need to be played softly
- mp - this is read as mezzo-piano and it tells you that the notes are meant to be played mildly soft, just under your average volume
- mf - this is read as mezzo-forte and it tells you that the notes are meant to be played mildly loud, just above your average volume
- f - this is read as forte and it tells you that the notes are meant to be played loudly
- ff - this is read as fortissimo and it tells you that the notes are meant to be played very loudly
- fff - this is read as fortissimo possibile and it means that the notes from that section are to be played as loud as possible
3. Figuring out your volume levels
Volume indicators are cool and all but there is a small problem. They are very abstract. I mean sure, they're to the point with what they mean. But what does as soft as possible or as loud as possible mean?
This is relative to each and every musician out there. And I say this because what you might feel is as loud as possible may be different from what I feel is as loud as possible. Let's take the piano as an example. a fortissimo possibile volume would usually mean that you hit the piano keys as hard as possible without playing extra notes and you know, not hurting yourself.
So, how should you go about it? Well, there are two things you can do in order to understand how loud or soft each volume indicator should be:
- listen to other people playing songs - Spotify and YouTube are full of classical music songs, so the best thing you can do is take a listen to such songs from Mozart, Beethoven, etc. and take a look at the music sheet for the song to figure out the volume level for each indicator
- play some songs and accustom yourself to your own volume levels - I cannot stress this enough, but everyone plays songs differently; and while technique is useful and it has to be done correctly, interpretation is subjective to everyone; that's why one of the best ways to figure out these volume indicators is to play songs...like a lot of them
-
Lesson
Pentatonic IX
- Lessons Classrooms
- 4 Replies
3 Notes Per String - Horizontal - 3 String Note Groups - B minor
Load more
Filter
Want to stream? Send us your idea!
Start a conversation below with @Radu-Cristian Perde and send us your idea for your stream
SEND YOUR IDEA